Designing studies for remote data collection
This guide provides a series of steps for creating studies for a digital format using narrated videos that children can work through independently on an online platform (e.g., using our online platform Discoveries Online). We walk through the process of animating your study (using either Keynote or PowerPoint) and setting up your study online (using Qualtrics). Of course, other programs and applications may also work, and some steps may not apply to all studies. Please feel free to use this guide as appropriate for your specific study!
Steps for creating an online study
Step 1: Adapting your study for animations
With a few tweaks to the scripts you use for your in-person studies, your study will be easier for children to complete remotely.
Step 2: Preparing your stimuli for animations
Never recorded audio before? We have tips on how to quickly record high-quality audio, as well as find and create images to use in your animations.
Step 3: Creating your animations
No professional animating software needed. Here's how we create our animations using Keynote and PowerPoint.
Step 4: Getting your animations online
Here's how our lab uses Qualtrics (an online survey platform) to present our animated studies in a child-friendly manner.
Bonus: Advanced Animation and Video Editing
To those who want to take the next step in their study design, we have some tips regarding helpful programs like Adobe Character Animator, Premiere Pro, and After Effects.
Adapting your study for animations
Make your script child-friendly for unmoderated research
Throughout your study, be sure to think about how a child who cannot yet read would know what they are supposed to do. Certain phrases might not be on the script of an in-person study but will need to be recorded for an online study. These may include:
- Natural transitions between tasks (e.g., "Alright, let's try another game.")
- Debriefs and thank you's (e.g., "Thanks for all your help!")
- Response options for forced-choice questions
Describing the choice options by reading them out loud—or better yet, animating them—is important to help children complete studies as independently as possible. This is key for minimizing the chance of parent interference.
Think about how to best capture your data
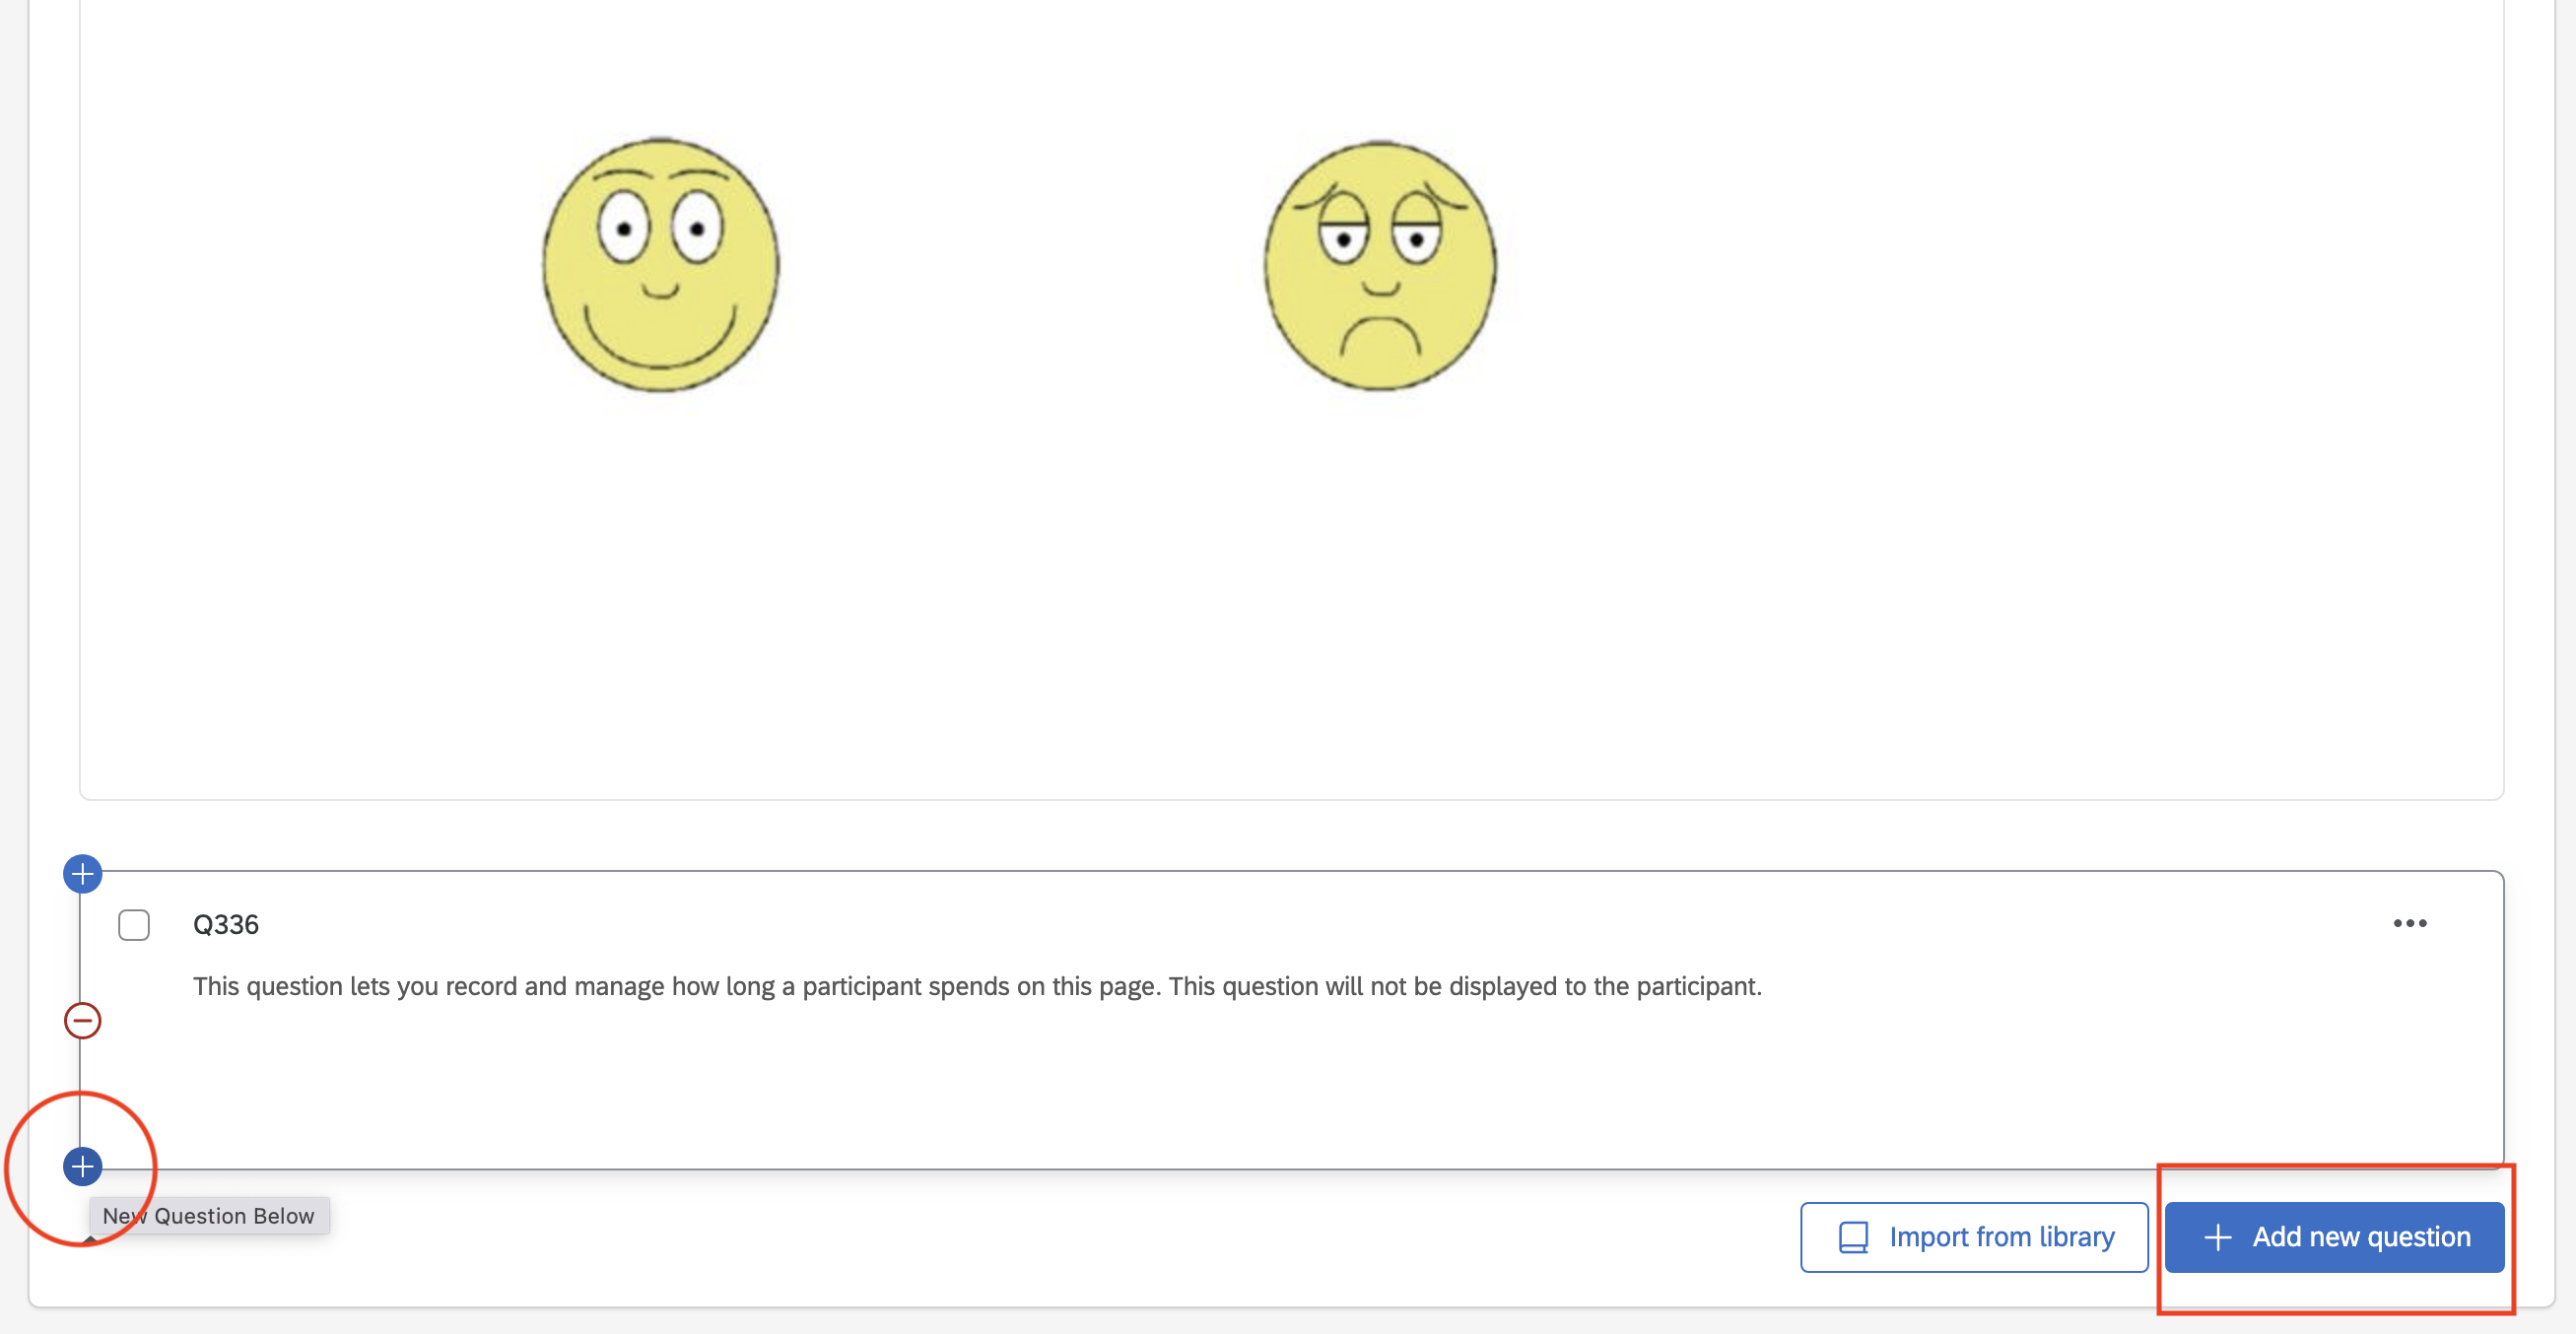
- For studies with a response scale, think about pictures (e.g., smiley faces, stars, etc.) that you could present on the screen for children to directly point to/choose from.
- For studies that measure persistence or exploration, think about ways that you might be able to code for children’s behavior through video or options you may give children to continue or stop an activity.
- You can code for anything that can be reliably captured from a webcam video. This includes children’s verbal responses as well as aspects of children’s interactions with parents such as their conversations, behaviors like looks, etc. We've outlined here how we code webcam videos using Datavyu.
Find the "breaks" in your script
In prep for animating in Keynote or PowerPoint, you'll need to think about where you will want to put your “breaks” between slides. This is usually where you need to change the stimuli that is being presented on the screen or where you want to ask a question that requires a response from the participant.
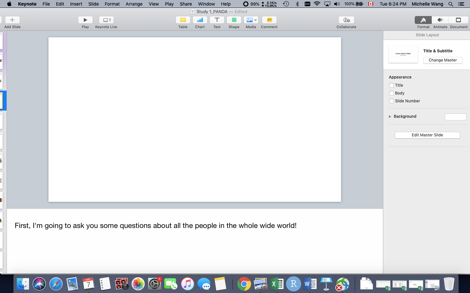
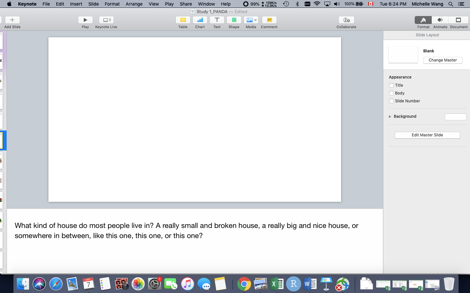
For example, here is the first few sentences from a script of one of our studies and where we inserted breaks:First, I'm going to ask you some questions about all the people in the whole wide world! [break – switch to next slide] What kind of car do most families have? A really old and broken car, a really new and nice car, or somewhere in between, like this one, this one, or this one? [break – switch to next slide] What kind of house do most people live in? A really small and broken house, a really big and nice house, or somewhere in between, like this one, this one, or this one? [break – switch to next slide]
It is usually pretty obvious where breaks will be needed, but it is helpful to have them clearly marked to make the animating process go more quickly. In addition, it is helpful to be mindful of maintaining a balance between not splitting the script into too many slides (in order to minimize the number of recordings and the amount of programming in Qualtrics needed) yet also keeping the slides short enough that the resulting videos will run smoothly (we try to keep most videos under or around 30 seconds).
Preparing your stimuli
Audio stimuli
When preparing your audio for your study, you have a number of options available to you.
You can record the audio directly using your animation software (e.g., directly in Keynote or PowerPoint)
as you are building your animations, or you can record it in advance using audio recording software.
Both strategies have their benefits, and it’s up to you to decide which strategy makes the most sense
for your project. However, in the long term, it is likely to your benefit to record audio separately using
audio recording software.
Recording directly in animation software
- Requires no additional software
- Fewer steps for getting audio into you animations (e.g., no need to import the audio)
- Doesn't create separate audio file by default
Recording using dedicated audio software
- Easier to edit and trim audio files
- Creates separate audio file by default, which makes it:
- Easier to reuse the same recordings across multiple trials, which saves you time and creates consistency across trials (e.g., by ensuring the intonation is the same across trials)
- Easier to share your stimuli with others (including your future self!), who may wish to use that audio for future studies with similar measures
- More advanced software provide more editing features, e.g., the ability to filter out background noise
How to record audio in commonly available tools
Keynote
To record, simply go to the slide that you would like to record for and click Insert → Record Audio. Within Keynote, you can only trim the ends of audio and adjust the volume. For more details on recording audio in Keynote, see (link to Keynote section)
PowerPoint
To record, simply go to the slide that you would like to record for and click Insert → Audio → Record Audio. You can trim audio in PowerPoint but the process is a bit clunky, and we have found that it can sometimes cause the program to crash. For more details on recording audio in PowerPoint, see (link to PowerPoint section)
Quicktime
This tool comes with MacOS and is available to download for free onto Windows.
Voice Recorder
This tool is the preinstalled audio recording tool for Windows computers.
Using the audio tools already available on your computer may be enough for what you need, but in some cases, you may find the additional features of professional-grade software useful for ensuring you have the best audio quality possible for your studies. For example, while the most effective way to fix bad audio recordings is to simply re-record the audio, there might be cases where that is not an option for you (e.g., time constraints, the person who recorded the audio is no longer available). Professional software makes it possible to filter out background noises and to splice together audio in a way that sounds more natural than what you can do with simple audio recording tools.
Some professional-grade tools you might consider are:
Adobe Audition
Adobe Audition is great if you are already using other Adobe products (e.g., Photoshop, Premiere Elements) to design your studies because it has a number of features that allows it to integrate more easily with those other tools. The interface of Audition is clean and easy to navigate, and there's great documentation on how to record audio, edit and trim audio, equalize sound levels across audio files, and edit out background noise/restore audio. This tool is not free, but your university may offer free licenses for Adobe products.
Audacity
Audacity is a free, open-source audio software that offers the same professional sound-editing features as Audition. They have great documentation for how to edit audio in Audacity. This tool is particularly popular with linguists.
General best practices for recording audio
Here's a few general tips to ensure that you have good quality audio for your study
- Do all the recording in one session. Otherwise, sometimes your voice sounds slightly different or the volume recorded might be slightly different.
- Have one person do all the recordings for one study. This keeps the audio consistent.
- Use earphones or a microphone. These will likely provide better recordings than the default microphone available in your computer.
- Record in a quiet environment. Make sure to turn off noisy appliances (e.g., the fan, air conditioner, dishwasher, washing machine, etc.). One of the best places acoustically to record audio is actually your bedroom or coat closet! If you can fit inside it, the small space and the clothing help to dampen background noise.
- Before doing all your recordings, do a few practice tests to make sure the audio sounds good
- When recording, pause for a couple of seconds before and after the sentence. You’ll have to trim these spaces out later, but this ensures that your audio doesn’t get cut off while recording and makes it easier to trim out mouse clicking (from starting the recording) or the noises your mouth makes as you prepare to talk. Additionally, if you have to later edit out background noise from your audio, these spaces make it easier for audio software to accurately remove that noise.
- Repeat the same line multiple times without stopping the recording, and splice out the version of the line you like most. You may find that this strategy helps you produce a more naturalistic audio recording.
Creating your animations
Choosing your program
Animated videos can be created using pictures and animations in a presentation program such as PowerPoint or Keynote. Google Slides has significantly fewer animation features than PowerPoint or Keynote, so it is not recommended for this purpose. Migrating animations and transitions between these two programs can be unreliable, so it is recommended to choose one program and stick with it.
Keynote and PowerPoint both support single-object animations as well as frame-by-frame animations, via
Keynote's 'Magic Move' transition
or PowerPoint's 'Morph' transition.
PowerPoint's frame-by-frame animations have stronger features than Keynote's frame-by-frame animations, so
if your animated video will rely heavily on frame-by-frame animation, PowerPoint is recommended.
Keynote's 'Magic Move' and PowerPoint's 'Morph' both automatically try to match objects across slides. However
in Keynote, there is no way to manually indicate matching objects if automatic matching does not achieve the
intended match; in PowerPoint, objects can be renamed in the Selection Pane to force a match (see
'Morph' transition tips and tricks).
In Keynote, you cannot have a sound play during a transition, but you can have a sound from a previous
slide continue playing over subsequent slides. In PowerPoint, you can have a sound play over a transition
as well as in the background over subsequent slides.
Keynote exports videos to .m4v, a proprietary Apple format that is not supported on all platforms and services. .m4v files are also significantly larger than their .mp4 equivalents (note that some survey services, such as Qualtrics, have a file size limit that they are able to host). .m4v files can be converted to .mp4 using a video transcoder such as Handbrake (free). PowerPoint exports videos to .mp4, a widely supported format.
The rest of this guide will be written using Keynote as the example program.
Using Keynote
Basic Steps
Below, we first outline the basic steps you will need to go through to create your animations using Keynote. However, there are several workflows you can use as you go through each of these basic steps. Each workflow has their own pros and cons, and you may find that one workflow works better for you.
If you plan to record your audio using Keynote, it’s helpful to first create blank slides and copy and paste the script to a new Keynote file’s presenter notes section. For instance, this is how the few sentences from our earlier example will look like in Keynote.
First, I'm going to ask you some questions about all the people in the whole wide world! [break – switch to next slide] What kind of car do most families have? A really old and broken car, a really new and nice car, or somewhere in between, like this one, this one, or this one? [break – switch to next slide] What kind of house do most people live in? A really small and broken house, a really big and nice house, or somewhere in between, like this one, this one, or this one? [break – switch to next slide]
The next step will be to arrange the study stimuli (e.g., pictures and animations on your slides). The specific steps to do so will depend on the study that you were converting from.
You have two choices: recording your audio directly through Keynote or importing audio recorded from another application. For more specifics about audio, see our detailed guide on audio recordings.
Recording your audio directly in Keynote
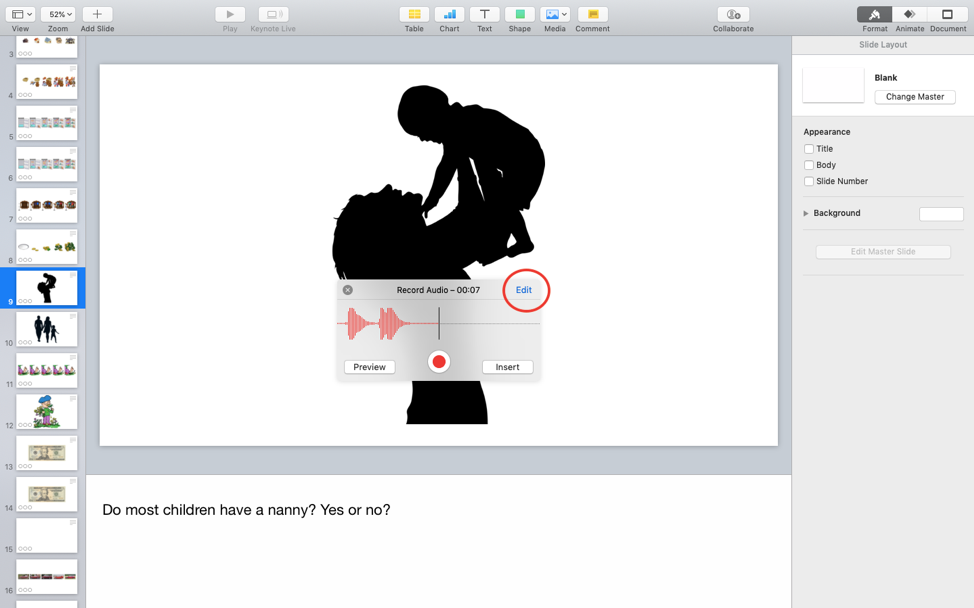
To record, simply go to the slide that you would like to record for and click
Insert → Record Audio. When recording, you will want to leave a couple of seconds
before and after the sentence to ensure the best audio quality (see general tips for audio here).
After recording, click on the edit button circled below:
Then, trim the recording to cut the extra time before and after the actual recording (as shown below). Be sure to remember to actually click on the scissor icon (as circled below) to ensure that the audio clip trims, and then click Done.
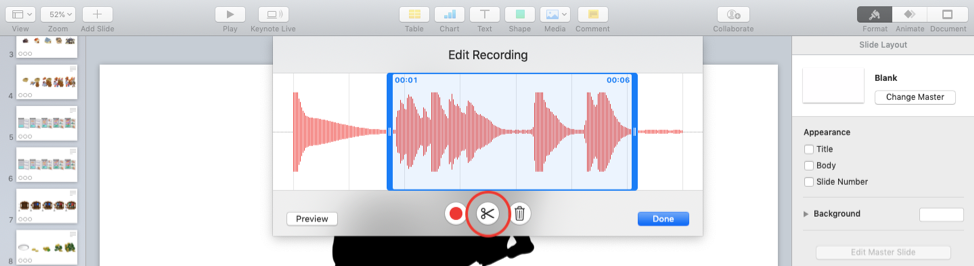
The last step is to click Insert (as below) to ensure that the audio recording is finalized and saved.
Importing audio recorded in another application
Alternatively, if you recorded your audio using another application, you can import audio by simply dragging the audio file from the folder it's stored in directly onto the appropriate Keynote slide(s).
When doing your recordings for each slide, one thing that you will have to keep in
mind is how you would like to set up your animations (if needed) for that slide.
Whatever the purpose of it is, the way to set up an animation is the same: simply
select the object (i.e., picture, text box, shape, etc.) that you want animated,
click Animate at the top-right corner, and select the type of animation you would
like to add from the three categories (Build In, Action, Build Out; the Build In
and Build Out animations are simply transition animations that will allow the object
to appear or disappear, and the Action animation will allow the object to move without
appearing or disappearing, such as a jiggle or a slide).
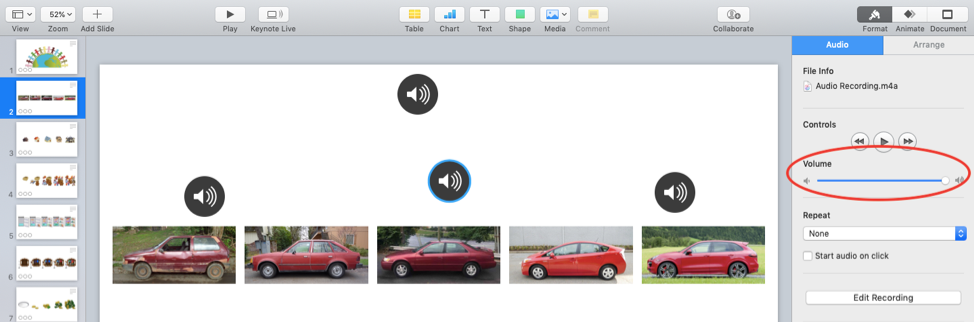
Before exporting, remember to always preview all of your slides first to ensure that
the audio recordings and animations run smoothly. One potential issue that sometimes
comes up is that the volume might still sound different for different slides. To
adjust the volume for each audio clip, click on that specific clip and then
select Format on the top right corner. Then, you will be able to adjust for
volume (as circled below).
When you have ensured that your slides are ready, there are two ways that you can export your animations: through slide-recording or through manually exporting each slide.
Slide Recording
As you walk through your presentation, you can capture video by screen recording. This strategy of exporting is particularly pertinent if you are narrating your study as the animations play.
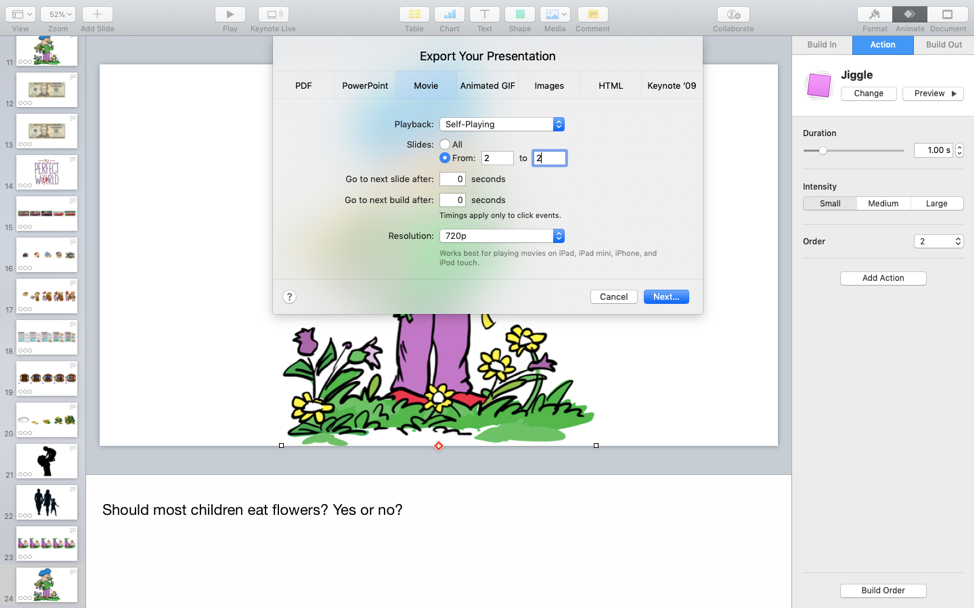
Manually exporting videos
To manually export videos, select File → Export To → Movie. You will have to
export slide by slide for each video, so enter the slide number that you would
like to export for both From and to. Enter 0 for the fields Go to next slide
after and Go to next build after and then click Next. Choose the folder in
which you wish to save the slides and name the slide by either number or content
to help you differentiate between the exported movies (the default name for all the
exported movies will always be the name of the Keynote file). Repeat for all of
your slides.
This step is fairly straightforward and is the last step before moving to Qualtrics.
The only small note for this step is that, sometimes, based on your recording
and animation lengths, the last frame in an exported movie might be a black
screen. If this happens, feel free to trim the last few milliseconds of your
movie to avoid the black screen showing up in your actual survey presentation.
Different workflows for doing animations in Keynote
Above, we have outlined the basic steps for creating animations in Keynote, but there are a number of different workflows you can use to create animations. To illustrate each of these workflows, we will walk through the five methods using the same slide as an example.

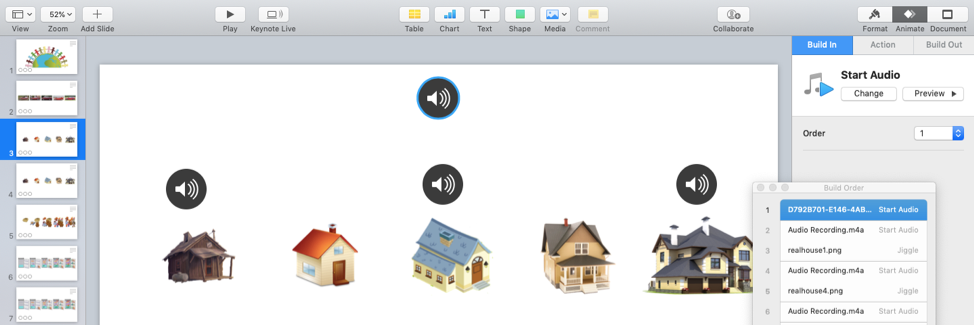
In this slide above, we have five different animations that we want to set up. We want the first house to jiggle at “a really small and broken house”, the fifth house to jiggle at “a really big and nice house”, and the second, third, and fourth house to jiggle at the three “this one’s”, respectively. Using the first method, we will drag the entire 13-second audio recording to the beginning of the Build Order list. For the first animation, we will time how many seconds are supposed to pass before it (i.e., how many seconds before the first house should jiggle). In this case, it should be 2.5 seconds, so we will select After Build 1 under Start and then put in 2.5 seconds under Delay (as circled below).
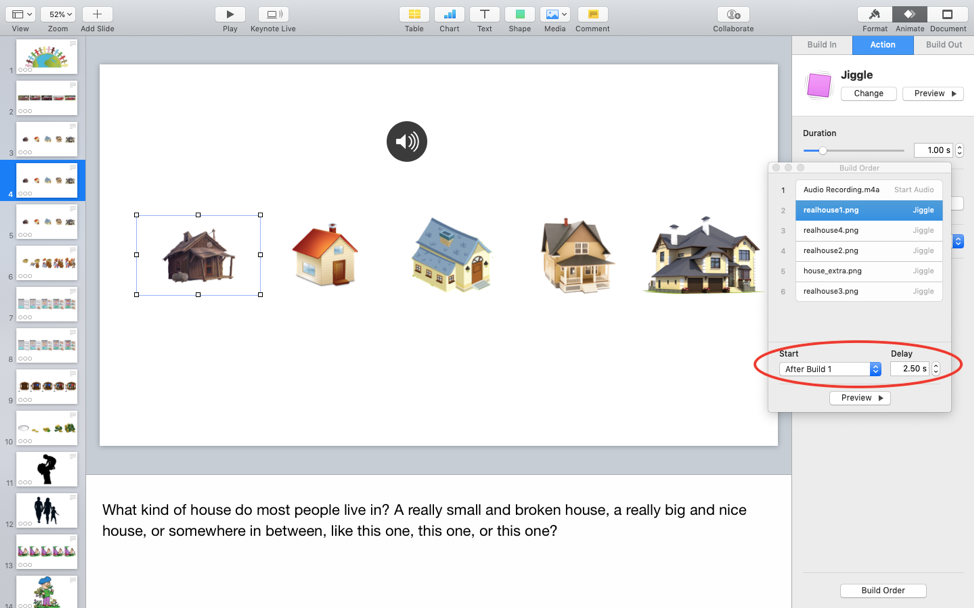
It is also fine to just guess how long the delays are in between animations,
use the Preview button to gauge if it is a little too long or too short, and
then adjust accordingly.
Continue the above steps for all your animations on that slide (set Start as
After [previous animation] and set Delay to be the number of seconds needed
after the previous animation). After working through all the animations, preview
them to make sure that they run smoothly.
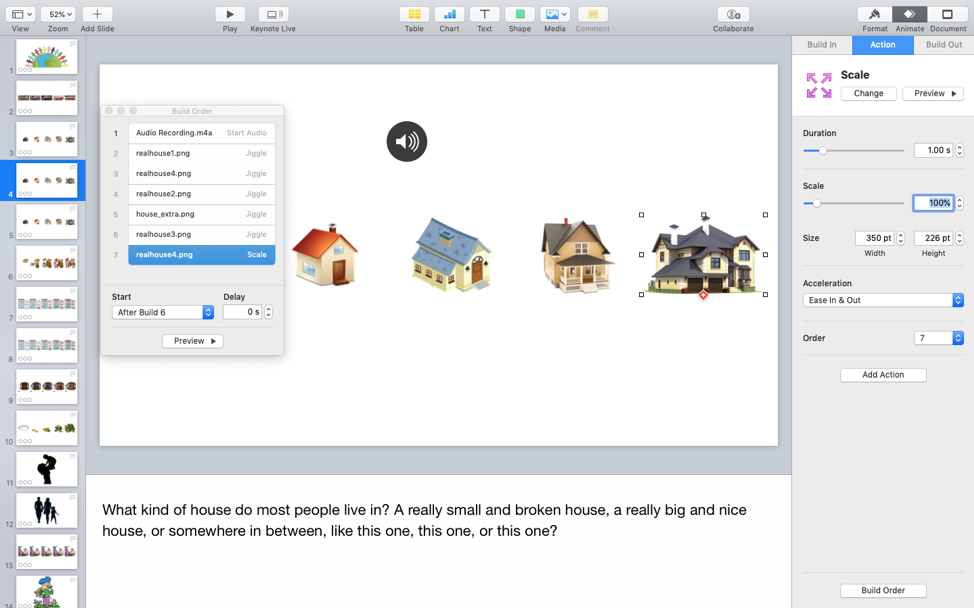
One issue that we sometimes run into is that the audio might run longer than the
last animation – in this case, the audio recording will get cut short after the
last animation finishes (e.g., after the fourth house jiggles, the recording might
still have not played the word “one”). Most of the time, you do not want to extend
the last animation to be longer than necessary (e.g., make the fourth house jiggle
for a longer period of time than the other houses), so one way to work around this
is to randomly select an object and add a Scale animation to it. Set Scale to be
100% and Duration to be the number of seconds before the audio recording ends (as
shown below). That way, the audio will not be cut short until the end of this “animation”.
Taking the same slide as an example, we could also record separate recordings
for each animation (“What kind of house do most people live in?”/
“A really small and broken house,”/ “a really big and nice house,”/
“or somewhere in between, like this one, this one, or this one?”). A benefit
of using this method is the possibility of recycling audio recordings when there
are certain sentences/clips you will need for multiple slides (e.g., in this study,
we use “or somewhere in between, like this one, this one, or this one?” ten times
and by recycling this clip, we can both save time and ensure consistency). A tip
for using this method is to place the multiple recording clips over their
corresponding objects/animations (as shown below). This way, you can easily
remember which audio recording goes in which place. One added benefit to this
method is that recycling clips is often ideal for different conditions in a
study, since you can ask the same question identically across conditions if
you use the same audio clip.
The rest of the building order process is about the same as the previous method. Another benefit of using this method is that it usually decreases the number of times you need to estimate delay times, because for audio clips and animations that go together, you can just directly select “With [previous build]” for Start and not put anything for Delay.
One potential problem with using this method, though, is that your recordings might not flow as well as with the previous method. One way to work around this is to still do the audio recording in one session and then just split it to multiple clips based on your animations (to do so, copy and paste as needed and then trim). Another way to deal with it is to combine this method with the previous method when necessary. For example, for really short sentences (e.g., “this one, this one, or this one”), it may not be as necessary to have a separate clip for each animation, so we can just have one clip for the last three animations, but separate clips for the first two animations.
This strategy is very similar to one previously described, except that all recordings are done in a different audio recording software, such as QuickTime. After individually recording each audio clip, you can simply drag the audio file (saved to your Desktop, or to another easily accessible folder) into the appropriate Keynote slide(s). The audio file will automatically become incorporated into your animation Build Order; as a default, it will be set to start “On Click.” Once all of the audio recordings have been imported into Keynote and arranged as you would like in the Build Order (whether each is timed to occur after a certain number of seconds, as in Strategies 1-2, or each is set to start “On Click”), it is time to record your slide(s). You can do so either using the screen record function, as described in Strategies 1-2, or by recording directly in Keynote. To do so, you can use the “record slideshow“ feature in Keynote (navigate to Play → Record Slideshow). Here, you can either just click once to start the set of pre-timed animations and audio recordings, or you can click on each animation/audio recording as you go if they have been set in your Build Order to “On Click.” Once your recording is done, you will export it as a movie file (see Step 7); only once a recording is exported can you clear it from Keynote (Play → Clear Recording) and start recording a new slide.
Another approach to recording your slide is to arrange all animations to
start “On Click”, and to use the “Record Slideshow” feature in Keynote (navigate
to Play → Record Slideshow). This is very similar to the other screen-recording
option in Strategy #5, where you click at timepoints when you want your animation
to play. However, in this approach, you are narrating your presentation in real-time,
rather than using pre-recorded audio clips. Some of the benefits to using this
feature are that (1) your presenter notes will be available to you at the bottom
of the page to organize and read through, (2) you can clearly keep track of how
long your recording is, and (3) you can see the upcoming animation “builds” or
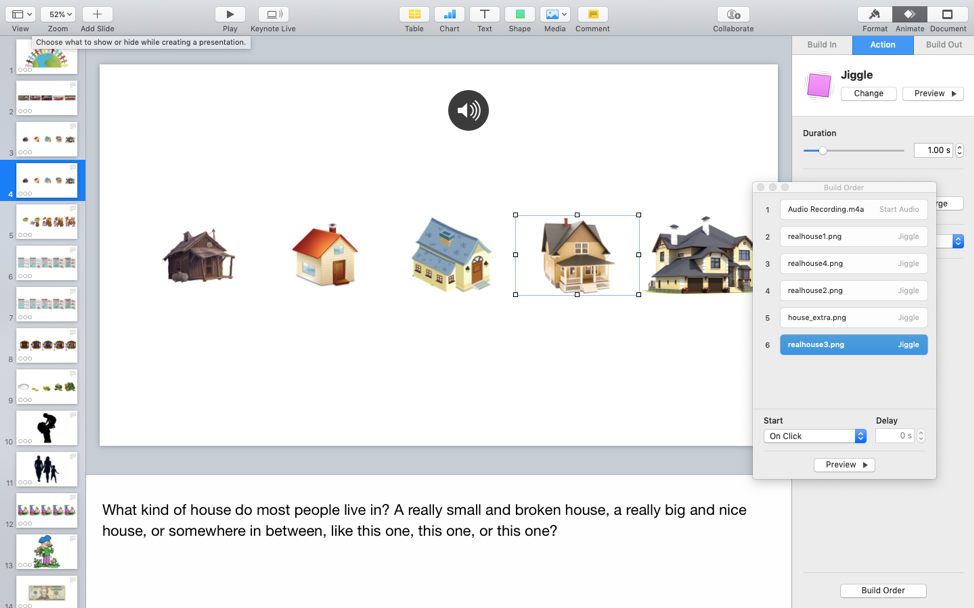
slides on the left side panel, as a reminder (see image below). Using this strategy,
you will want to export into video format after each recording, by clicking File →
Export To → Movie.
Similar to the first method, you can do all your recordings for each slide within one
audio clip. Arrange the audio to be at the beginning of your animations (as shown below).
Then, arrange the order of your animations as desired and select “On Click” under Start
for each animation. Then, record your slides by using the “Record Slideshow” feature
described above in Strategy #5. While presenting, click at timepoints when you require
an animation (e.g., click for the first time when the audio plays “a really small and
broken house” so that the first house will jiggle).
Setting up your study in Qualtrics
Steps for creating a child-friendly study
This tutorial assumes you have some existing (albeit limited knowledge) of Qualtrics (e.g., you know how to create a new survey, add a new question, and what a block is on Qualtrics). If you have used Qualtrics before, you’ve probably noticed that the survey features aren’t necessarily designed with young children in mind. Below, we’ve outlined the steps that we have found so far to be the most useful for creating a child-friendly survey, in particular, one where ideally the child is able to answer most questions without parent assistance.
You might think that it’s intuitive to have your survey structured so that each block contains a single task in your study.
However, we have found it useful to have separate blocks for each trial because it allows you to keep track of when participants are completing each trial.
Qualtrics allows you to record timing data for the onset and offset of any block, but not the onset and offset of questions within a block.
With that timing data from the onset and offset of a block, you can use Datavyu to sync children’s responses on Qualtrics with the participant’s
webcam video (see here for more detailed instructions about how to record the timing of blocks, and how to import this information into Datavyu
to link it to the participant’s video). This allows you to know exactly which trial a child is seeing throughout the video. This is useful for a
variety of reasons, including being able to exclude individual trials in which there was possible interference without having to discard all of the
participant’s data (see here for more information on interference and the role of parents), or allows you to easily match children’s verbal responses
to the questions or stimuli they saw.
Type #1: Creating buttons over still images using the Hot Spot question function in Qualtrics
Using the hotspot feature allows you to layer “buttons” over still images, so that children
can signal their answer choice by clicking on an image rather than a word. In our experience,
this allows for an easier and more accessible study experience, particularly for child participants.
To begin, you will want to export or screenshot the image of your question page
(typically the last build of the video you would have previously uploaded). Next,
navigate to your Qualtrics survey, then click “Add new question”, and change
question type to “Hot Spot”. Upload the image of your question page either by clicking
“select a graphic to use for this question”, or "choose graphic" in the left panel. You
can then click "Upload a new graphic" to select an image on your computer, or select an image
already saved in your Qualtrics graphics library. Make sure to adjust the width of the image
appropriately (this width should match the width of the video). If your slide includes
your question text, as shown in the example below, you will want to remove the sample text
in the box above your image by deleting what is in the text box, and leaving a literal space “ ”
otherwise Qualtrics automatically pipes in the prompt “Click to write the question text” again).
Once your image is loaded into Qualtrics, click on “Add Region” in the panel on the left,
and a highlighted box will appear. Click and drag the corners of the highlighted box to resize
it, and move it over what you would like to be the clickable “area” on your question image
(i.e., where you want it to indicate a response; Note: For developmental research, you might
want to make the clickable region a little bit bigger than the actual image you are layering
it over to allow some “buffer”). Click on the text box underneath the highlighted area to
manually enter a name/label for that area (see example below; Note: This text will not display
to participants taking the study, but will appear in your data export when that region is selected).
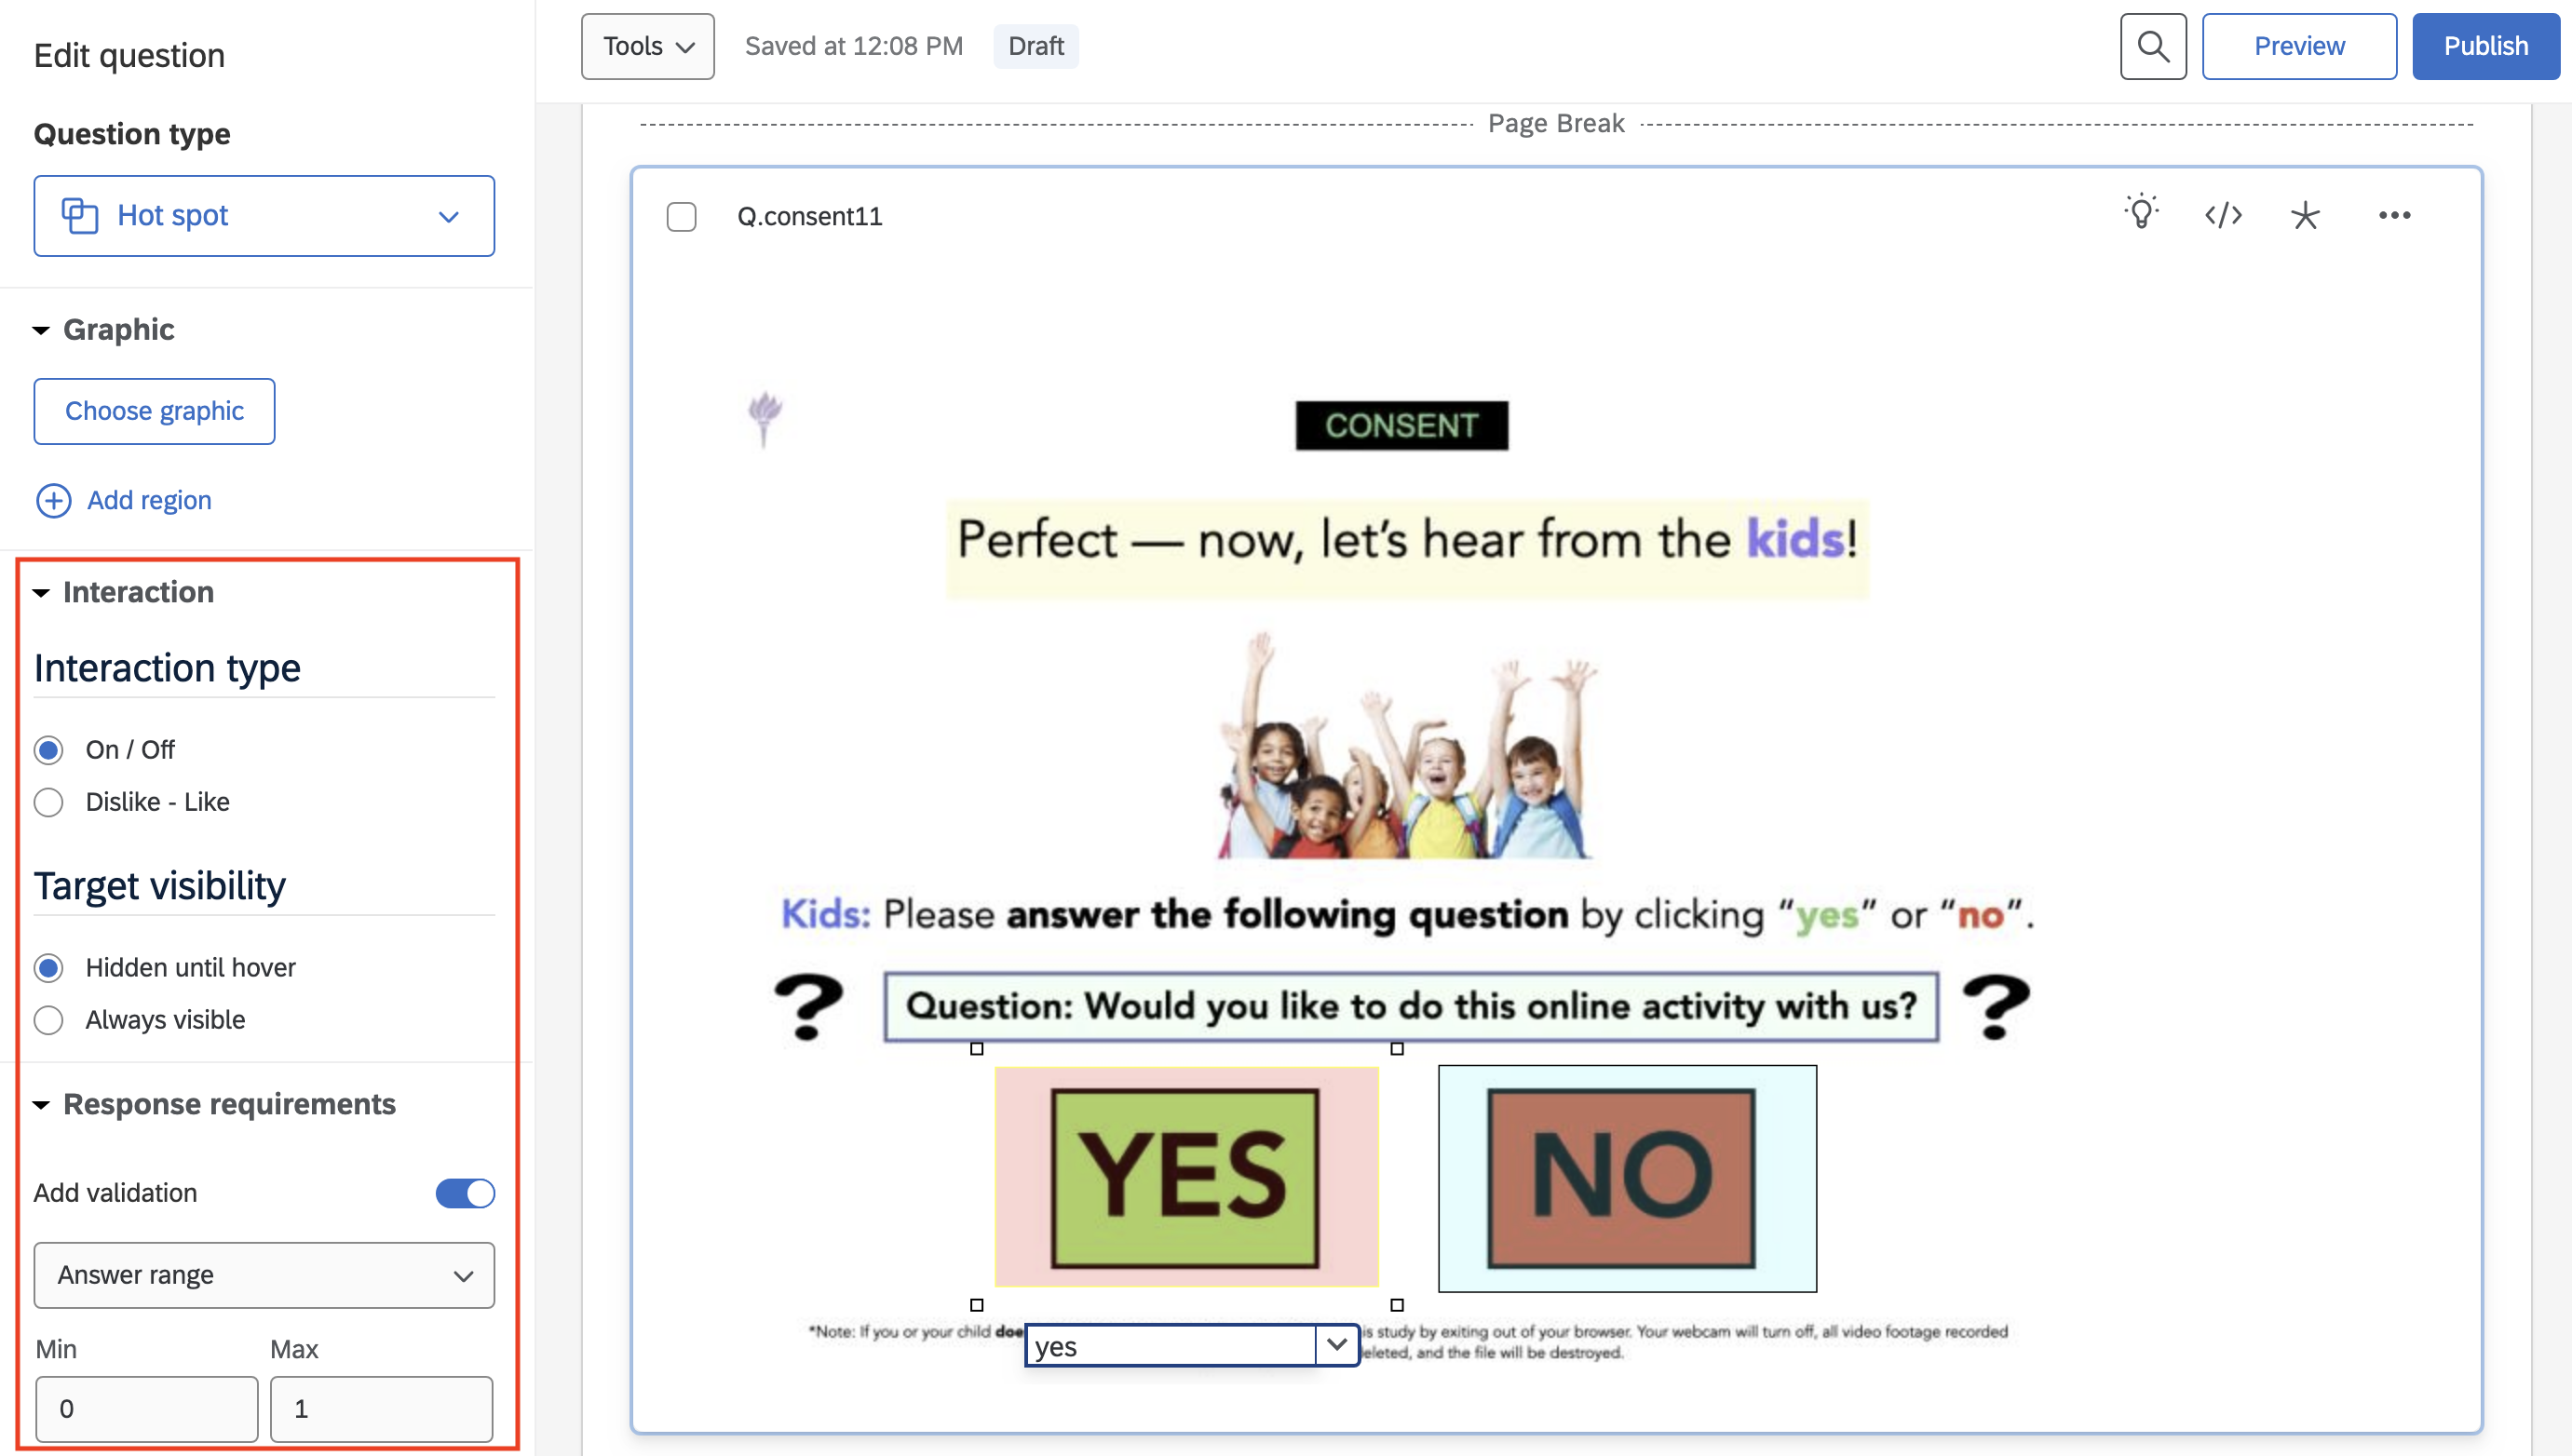
The Hotspot feature has three main customizable options that you can select based on your question type: (1) interaction type, (2) target visibility, and (3) response requirements (please see area outlined in red, in the example image above). Interaction type refers to the way you want participants to interact with the question type. Selecting On/Off means that participants will be able to “click” or “unclick” a region to indicate their response (and will probably be the most straightforward for children), while selecting Dislike - Like allows participants to express “like”, “dislike”, or “neutral” affect toward the stimuli in that region. Target visibility refers to whether or not you want participants to know that the regions you have highlighted are clickable areas. Qualtrics allows you to make regions “Hidden until hover”, or “always visible” (typically the default). Lastly, response requirements set parameters to how participants can respond to the question. Selecting “Minimum regions selected” forces participants to choose a certain amount of answers, and will not allow them to move forward until they have done so (however, you should check whether this option is permissible under your university’s IRB). Answer range allows you to set even more detailed parameters for how participants will respond. For most of our questions that ask participants to make a binary decision, we select the Answer range option, and enter a "0" in the “Min” box (to not force participants to make a decision), but enter a “1” in the “Max” box, so that participants are restricted from making more than one selection.
Currently, the description above only includes instructions for formatting square/rectangular clickable regions over images. However, Qualtrics does have the capability to create regions in customizable shapes. More information on Qualtrics’ Hot Spot function can be found here.
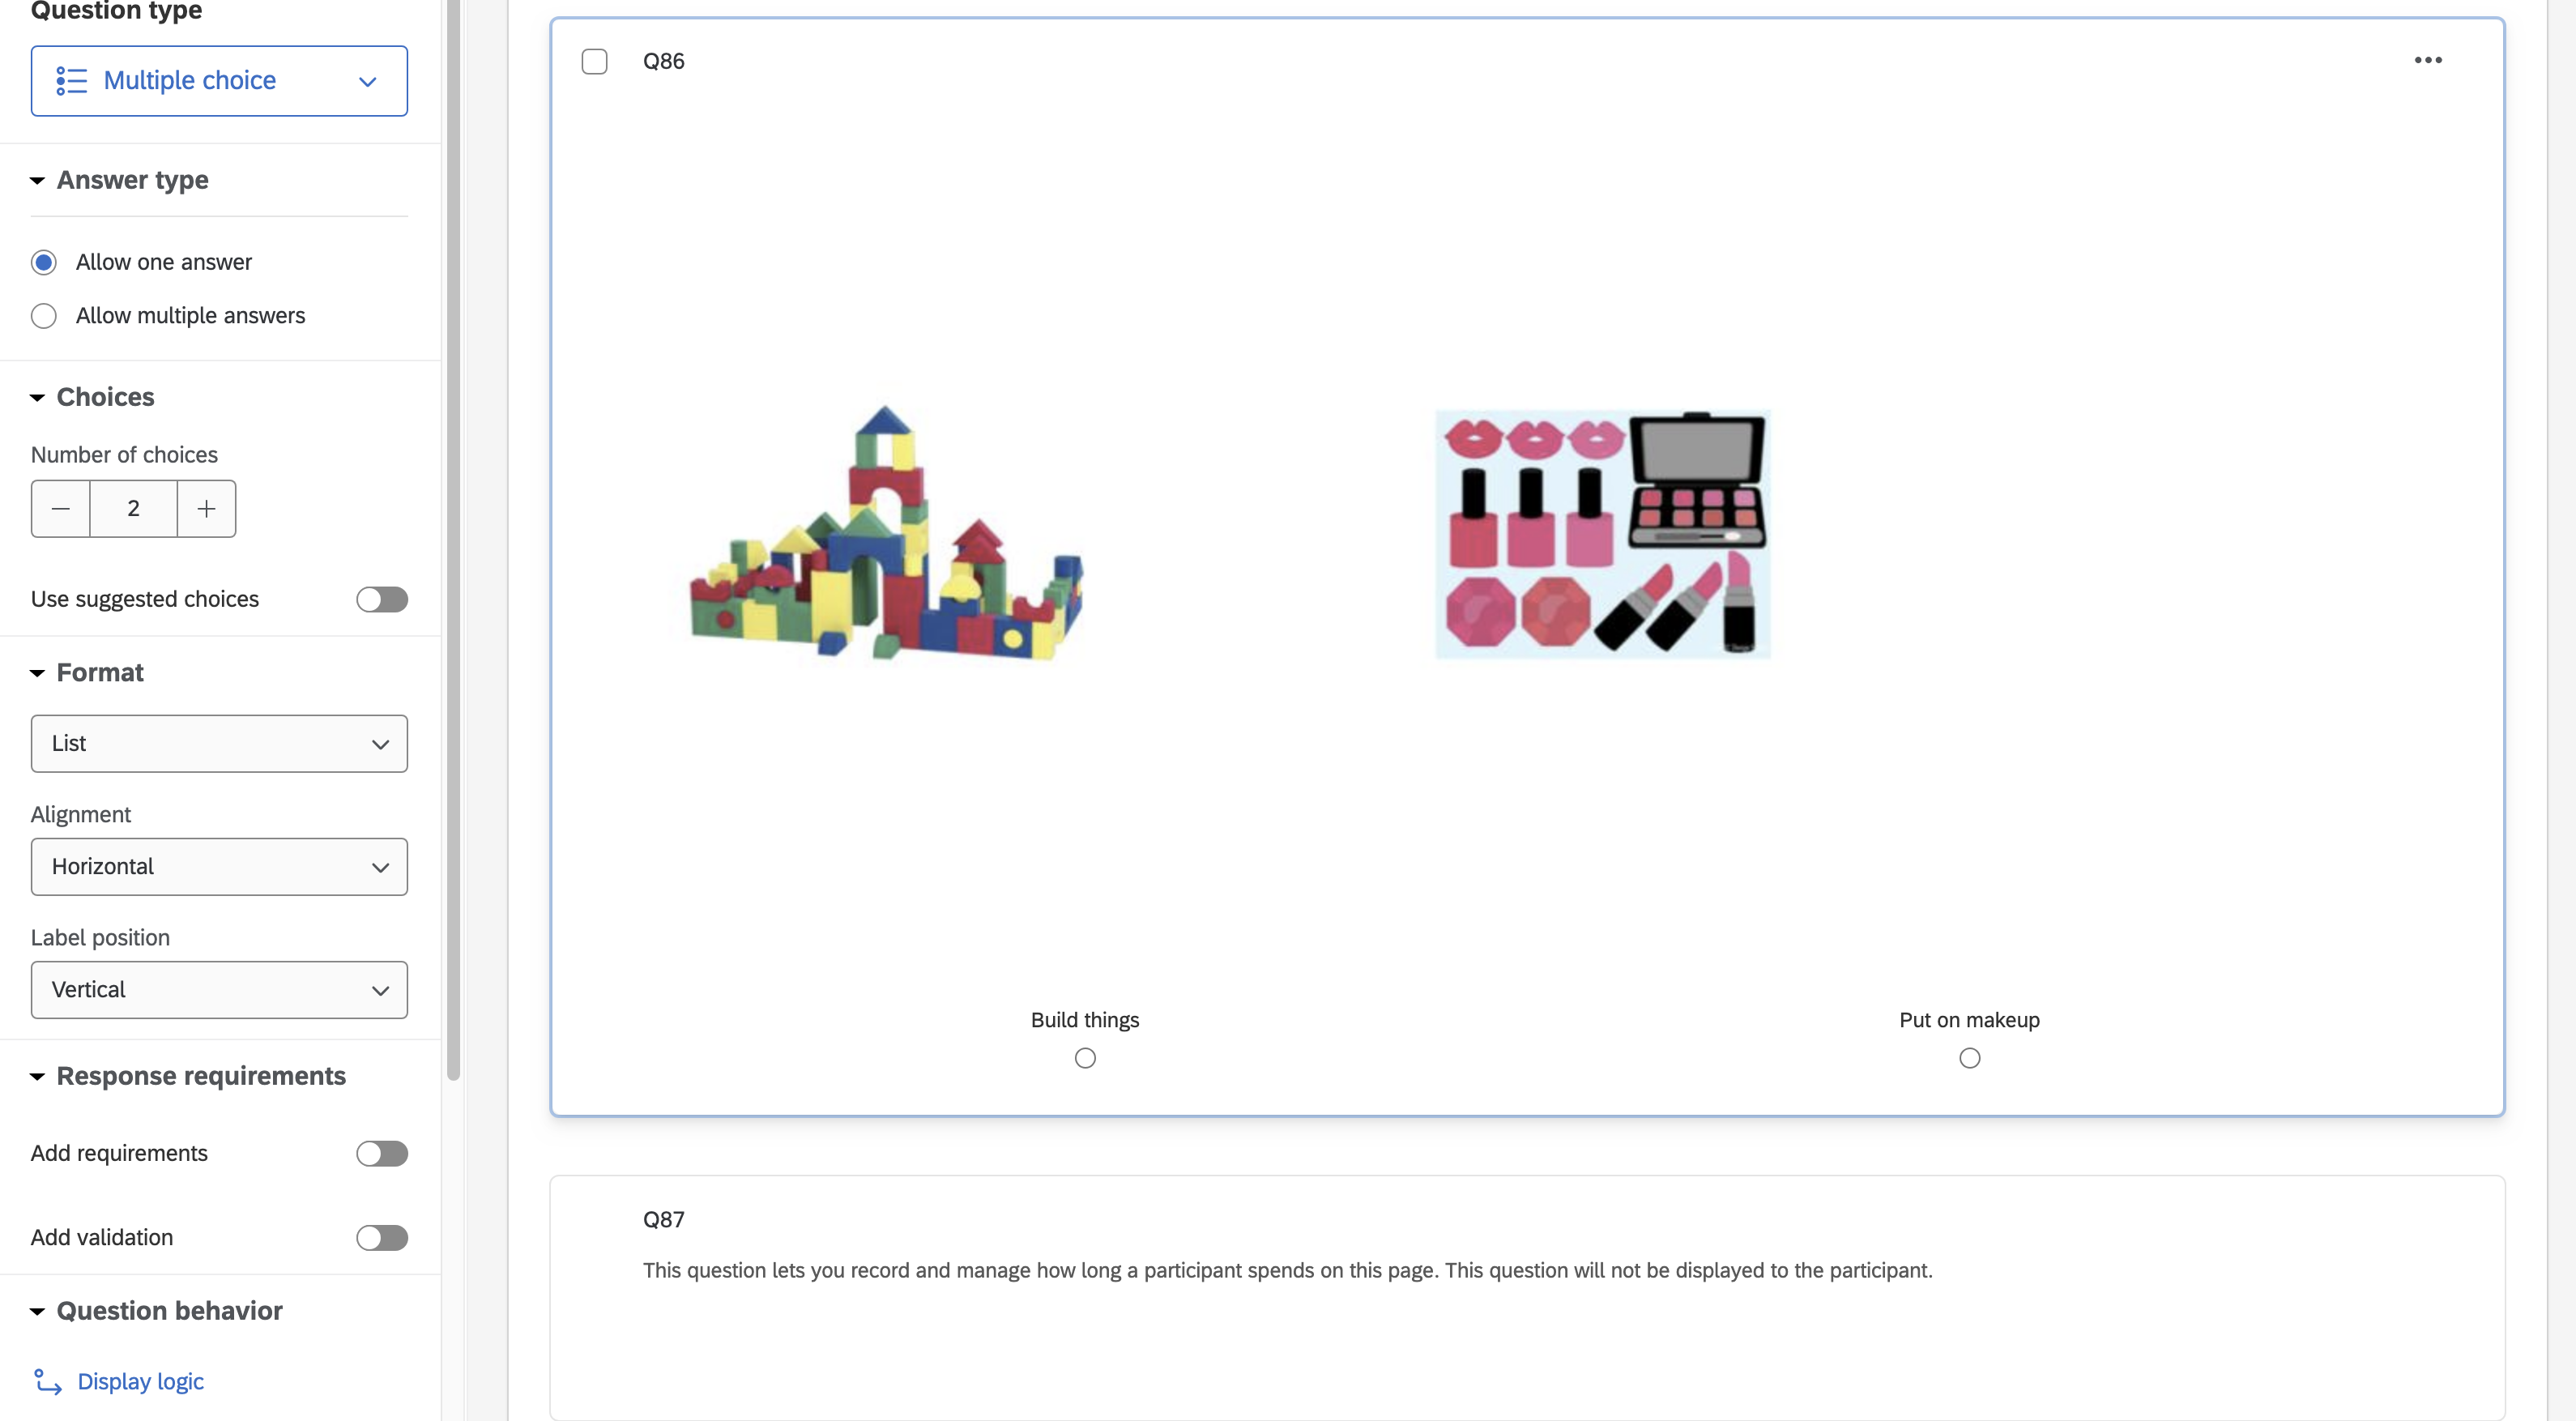
Type #2: Use a still screen of the question page and insert images as buttons below it
This is a very easy and straightforward way to create a response question. Export a still image
of your desired question page either by exporting your slides as pictures instead of movies
(exact same steps except select Export To Images instead of Movies) or by taking a screenshot
of the last frame. Then, upload the picture to a new question immediately following the video
with the same image as the last frame (again, exact same steps as uploading a movie except
select the picture icon instead of the movie icon). Remember to set the width to be the same
as the width you set for the previous movie to ensure a smooth transition between the questions.
Add your response choices below the still image. (You will also want to set the previous movie
slide to auto-advance to the following response slide; for instructions on how to do so, please
refer to # 2 under Step 10.)
As you can probably tell with some images, one limitation of this method is that it only works
well when the options are presented evenly and horizontally so that you can easily set up
the multiple choices to be directly below the corresponding choices in the picture. In some
cases, you can work around this limitation by setting up the multiple choices to directly be
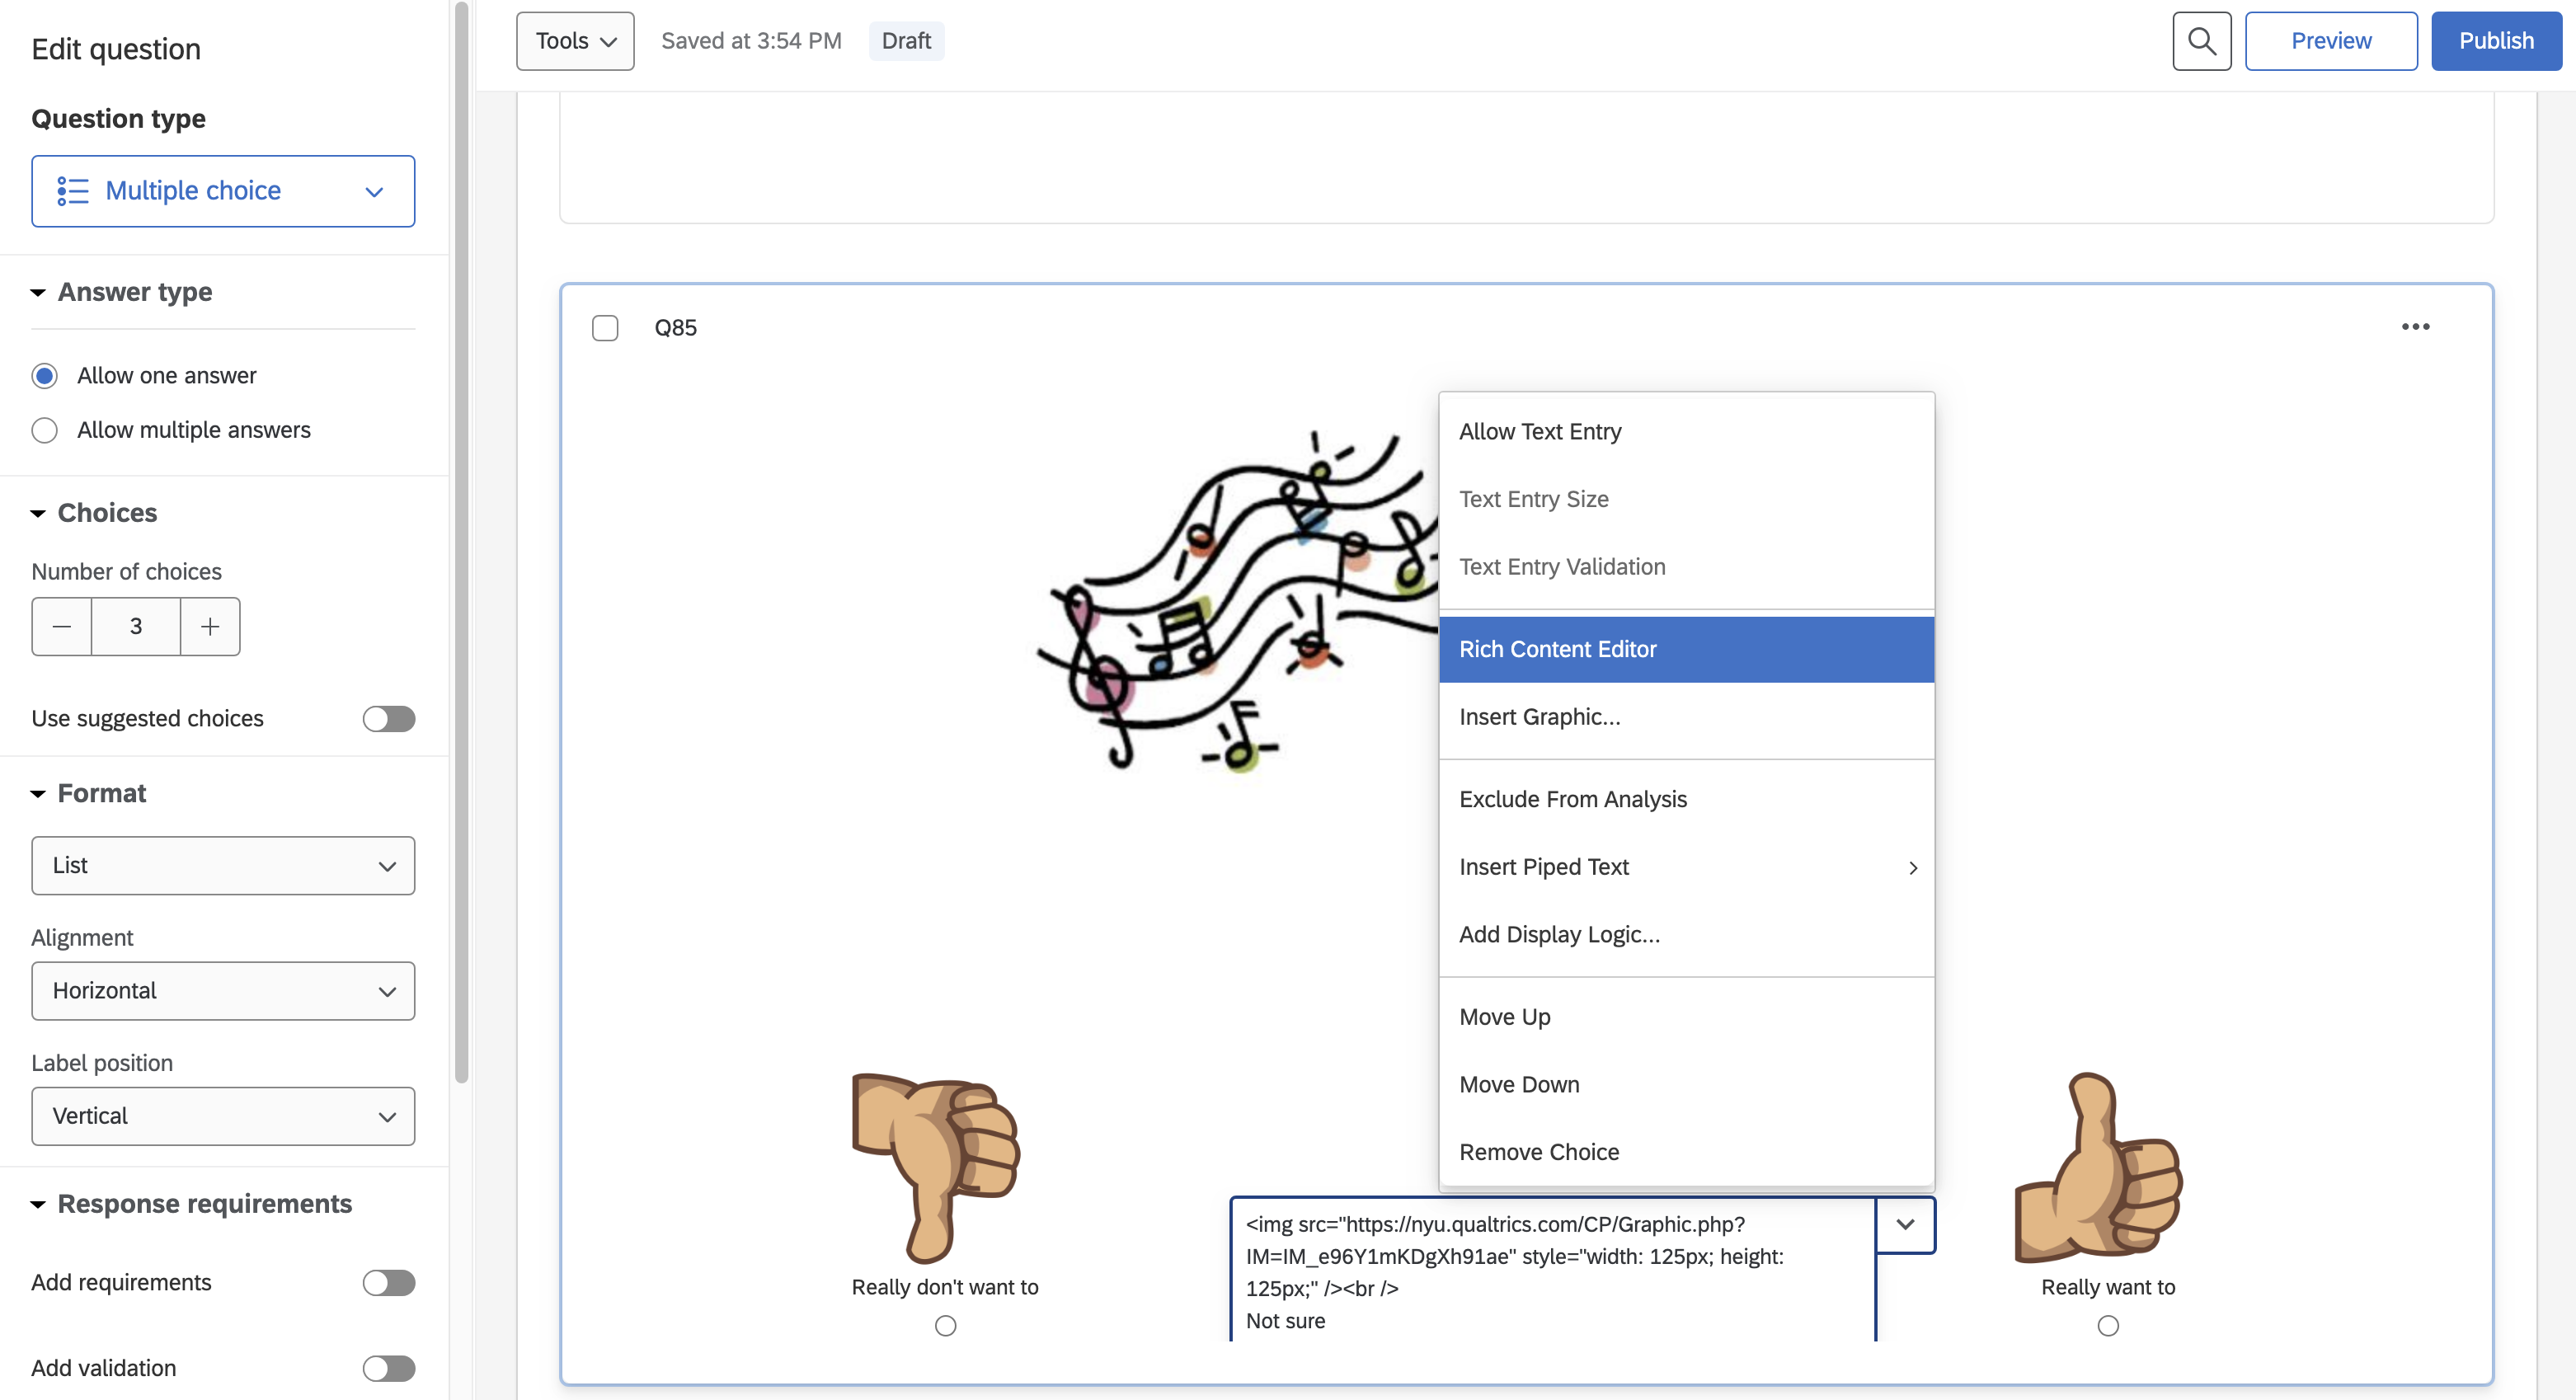
picture choices. To do so, select Rich Content Editor within each of your choices (as shown
below) and then upload the respective pictures you would like to present as choices.
Type #3: Directly insert response options below video
This method is the quickest way to set up response choices but only works for
certain types of studies/questions. For example, if the participant is old
enough to read independently and the choices are simple text choices, you can
directly set up the video within a multiple-choice question in Qualtrics and just set the
text choices directly beneath it (see below for an example).
However, one thing to consider when using this method is whether or not you want the participant to be able to respond to the question before the video stops playing (to avoid this, use the timing function; for instructions on how to do so, please refer to # 4 under Step 10). Another thing to consider is whether or not it matters for your study if the participant sees the choices before finishing watching the video (see advanced sections for how to do this).
To add media to individual trials, you will have to select different question types depending on your needs. To display ONLY a graphic (image or video), add a Text/Graphic question type and select what you want to display from the “Content Type” dropdown menu. For images, choose the “Graphic” option. For displaying videos, select “Text” from the dropdown menu, then enter the Rich Content Editor, and click on the movie icon (you might have to click on “More” to see it). Next, click on Select File From Library → Upload a New File → Choose File and then select the video you would like to upload. After clicking on Save, wait for the preview to show and then click on Advanced to enter your desired width and height (typical to set width as 720 or 800, which is about full screen – however, feel free to adjust based on your study’s needs). The width and height ratio should be automatically locked, so just entering width is enough. If your graphic already includes the relevant text, you will want to remove the sample text in the box above your image by deleting the existing text, and leaving a literal space “ ” (otherwise, Qualtrics automatically pipes in the prompt “Click to write the question text” again). Click Insert to save and finish.
Timing data is useful because it allows you to match up what the child was doing in the webcam video with what was happening onscreen in the study.
To embed timing information in Qualtrics, the first step is making sure that trials are divided into separate blocks within your Qualtrics study. The reason for this is that you can embed data before and after a block, but not within a block, so you can’t track the exact timing of questions within a block. Once you have trials in separate blocks, you can then set the timing information using Survey Flow in Qualtrics.
- In your study, click on Survey Flow
- On the right-hand side of your first block, click “Add Below”
- A new cell will appear asking, “What do you want to add?” Choose “Embedded Data”

- Once you select Embedded Data, you will be prompted to “Create New Field or Choose From Dropdown.

- First, you need to set the participant ID so that this information gets passed from the web platform to your Qualtrics survey. To do this, just click into the “Create New Field…” window, and enter “ID”

- This embedded data should be placed as the first element in your survey flow, so click “Move” and move it to the beginning of your study
- Next, you need to tell Qualtrics you want to keep track of timing by setting the Total Duration. Again, click Add Below 🡪 Embedded Data. Then from the dropdown menu, choose: Survey Metadata 🡪 Total Duration Q_TotalDuration. Move this embedded data to the beginning of your study, just after ID
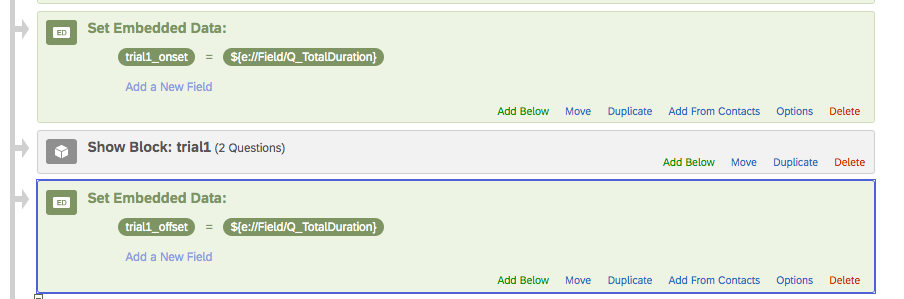
- You can now embed onsets and offset before and after every block you want to keep track of. To do this, again click Add Below 🡪 Embedded Data. Then click into the dropdown menu and name the data you are embedding.
- You can name this whatever you want (it will be the name of a column in your Qualtrics output), but we typically name ours something like this:
- XXX_onset
- XXX (Trial Block)
- XXX_offset
- Type in your embedded data name, then click on “Set a Value Now” and where it says Custom Value:

Enter this code: ${e://Field/Q_TotalDuration}
This basically tells Qualtrics, “record the time right now.” - Repeat to add onsets and offsets for every block you want to time throughout your study.
- You can structure this is a few different ways. The simplest is just to have everything lined up in the Survey Flow exactly as it appears. So, for example, if I have a trial called “trial1,” I can embed timing data like this:
- Often we have more complicated designs though—maybe we want to show trials in counterbalanced or random order. If you present multiple trial blocks and their timing all together in random order, you would have no way of knowing what you were timing! So, for these designs, you can split each trial block and its embedded timing into separate groups, then just randomize the presentation of the groups, like this:
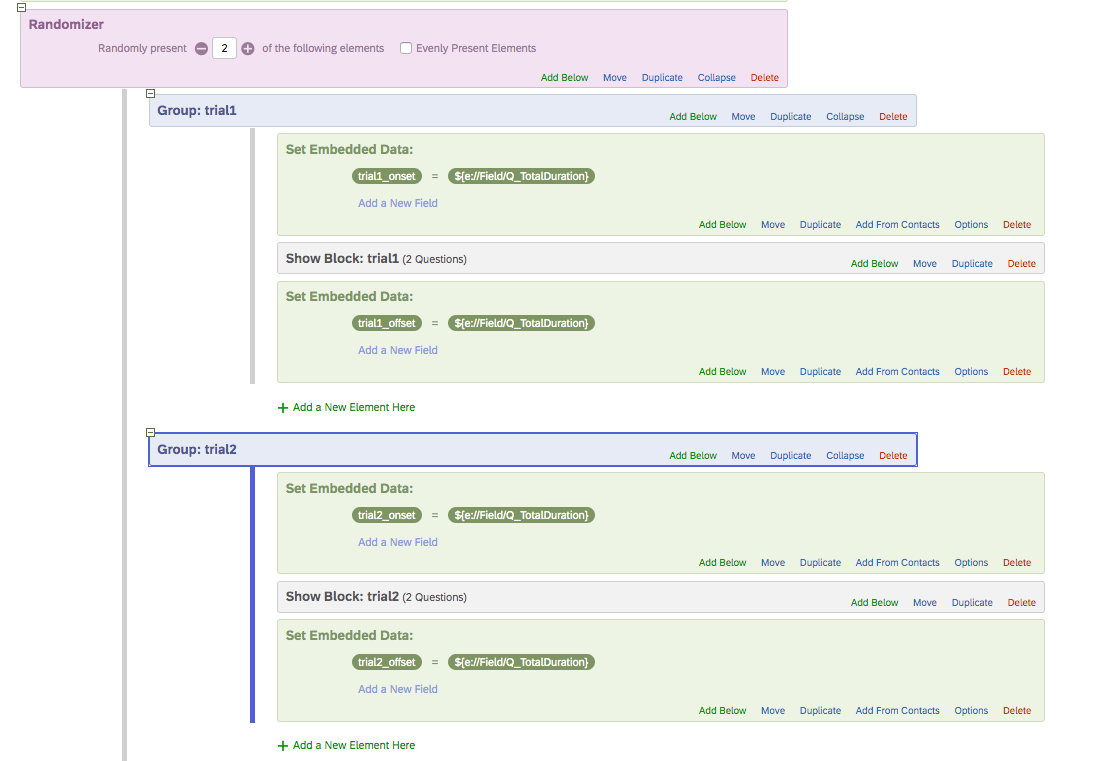
- Repeat the onsets and offsets for any sections you want to time. These can time multiple blocks, for instance if you have several blocks for consent and really only need to know the start and end of the entire consent portion of your study. In that case you can just add embedded data for “consent_onset” before the consent trial blocks, and embedded data for “consent_offset” after the consent blocks. But keep in mind that you can’t time trials within a block using this method.
To enable your videos to play automatically, click on the video that you want to set up and then select HTML View. Delete the first “<” at the beginning and paste these two lines of code:
Switch back to Normal View and the video should now be auto-playing.
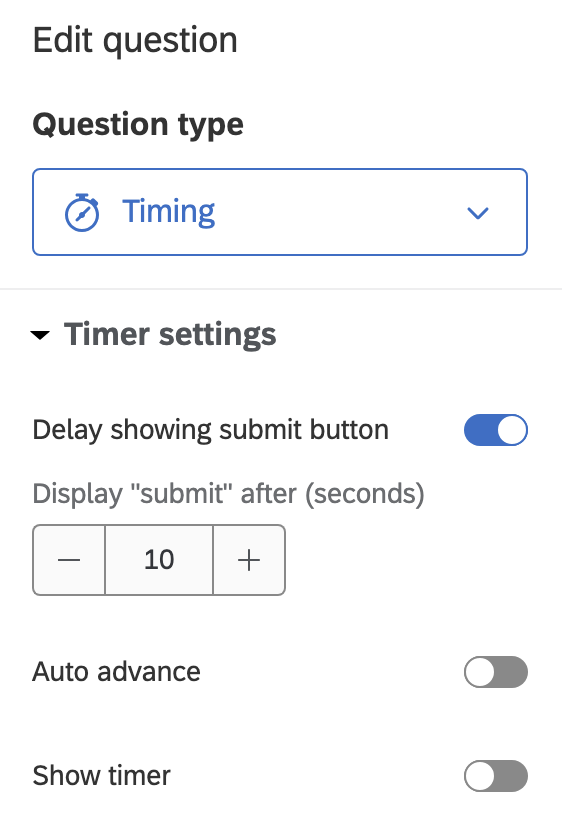
To set a video to auto-advance after a set amount of time, select the question that contains the video you wish to set up and add a new question directly below it.
Now, select Timing under Question Type. Here, you can choose to either (a) delay showing the submit button to “hold” participants on a page, or (b) enter the number of seconds that you would like the video to auto-advance after. One tip is to set this up (if needed) before setting up the auto-play function, because after you do so, the length of the video no longer shows up by default in Qualtrics, so you would need to go back to your raw videos to check the number of seconds you should enter. Another tip is that when entering the number of seconds, it might be a good idea to round up or even add a couple of seconds (feel free to adjust for more or fewer seconds based on the length and size of your video and how much your test/pilot runs lag) since poor internet connection might sometimes cause videos to lag for a couple of seconds when playing, and you want to ensure that the participant sees the full video.
1. Add JavaScript for the question with the video, and paste this:
2. Go into HTML view and remove the first "<" in there and instead add this line:
So, for example, this is what it looks like for my study question:
3. (optional) Remove the controls functions (i.e., the controls="true" in the second line AND the controls = “controls” text in the first line) if you would like to remove the video progress bar:
4. (optional) Remove the auto-advance setting in the timing question below if it was previously set and enter/keep the enable submit setting as needed (see below for example):
By default, when you set up questions in Qualtrics, participants will need to click on a submit arrow after each question to submit their responses. If you would like participants’ surveys to automatically advance after clicking their response, you will need to set up this auto-advance function. (The main thing to consider when deciding whether or not this is needed is whether or not you would prefer participants be able to change their mind about their answers – if not, you would likely prefer to have this function set up, but if so, you would likely prefer to keep the submit arrow button.)
To enable auto-advancing for participant responses, select the question that you would like to add the function to and click on the settings icon beneath it (as circled below).
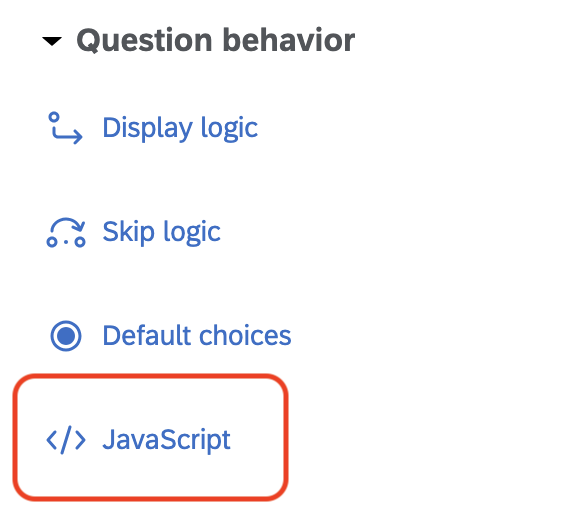
Then, select Add JavaScript and paste these lines of code:
Click on Save to finish.
For the question with the video, select Add JavaScript and add the code below. Make sure the video ID ("#vidid" in the example below)
matches the video ID in the HTML of your video.
Follow the exact same instructions as for auto-advancing functions (# 2 in this list), except enter in the number of seconds that you would like to disable submitting responses for participants under Auto-advance after (seconds) instead.
Before launching, it is a good idea to go through the study link a couple of
times to ensure that the study runs smoothly. You can use the preview function in Qualtrics to preview your survey. Mobile view
(at the top bar when in preview mode) should be off by default, but if you turn it on,
you will see mobile preview and desktop preview side-by-side (but please note that this
may cause any narrating voices in the audio to echo. Alternatively, you can test the survey
through the anonymous link under Distributions → Anonymous Link. Just remember to filter
out any test runs you might have done when you are analyzing the data. In addition, you can
use Tools → Generate Test Responses to make sure responses match your expected range
of responses.
Once the study seems to be complete and running smoothly, you should be good to
go to start collecting child development data online!
Survey Flow
For those who are unfamiliar with Qualtrics, here are some features that might be helpful to familiarize yourself with, both in general and especially for research in developmental psychology. Survey Flow is a feature in Qualtrics that allows you to easily organize the survey experience for your participants. Survey Flow allows you to customize basic survey elements such as the order in which participants will see certain Blocks, but can also handle more complex survey configuration that includes Randomizers, Embedded Data, and Branching Logic:
Nesting survey elements under the Randomizer in the Survey Flow will either display any given number of blocks or assign survey elements, at random. For using the randomizer to display blocks, you can either set your randomizer to select a given number of blocks to display (as shown in the outlined section below), or you can set it so that it displays all of the blocks you have listed, in random order. You can also sort blocks into Groups, and randomize the groups in the same way.
Next, Embedded Data is one of the most useful elements made available to you
in the Survey Flow. One benefit of this feature is that you can use embedded
data to collect information that you will need for processing your data later on.
For example, in order to keep track of participants’ survey completion, we set
embedded data in each of our studies at the beginning of the survey flow to record participants’ PANDA ID directly
from the platform.

Used in combination with Randomizers and Branching Logic, embedded data can even be used to organize the study experience for participants, while also making sure that you have a clean output file. In a 2x2 study design, you would need to randomly assign participants to one level for each of your two independent variables. One way to do this would be to place all potential combinations of your IV blocks (AA, AB, BA, BB) into a randomizer to display to participants. However, this could get really complicated if you have any condition-specific measures that would require complex branching logic. Instead, you can use randomizers at the beginning of your survey to set embedded data that would assign participants to one level for each of your two IVs, in order to create conditions (as shown below).
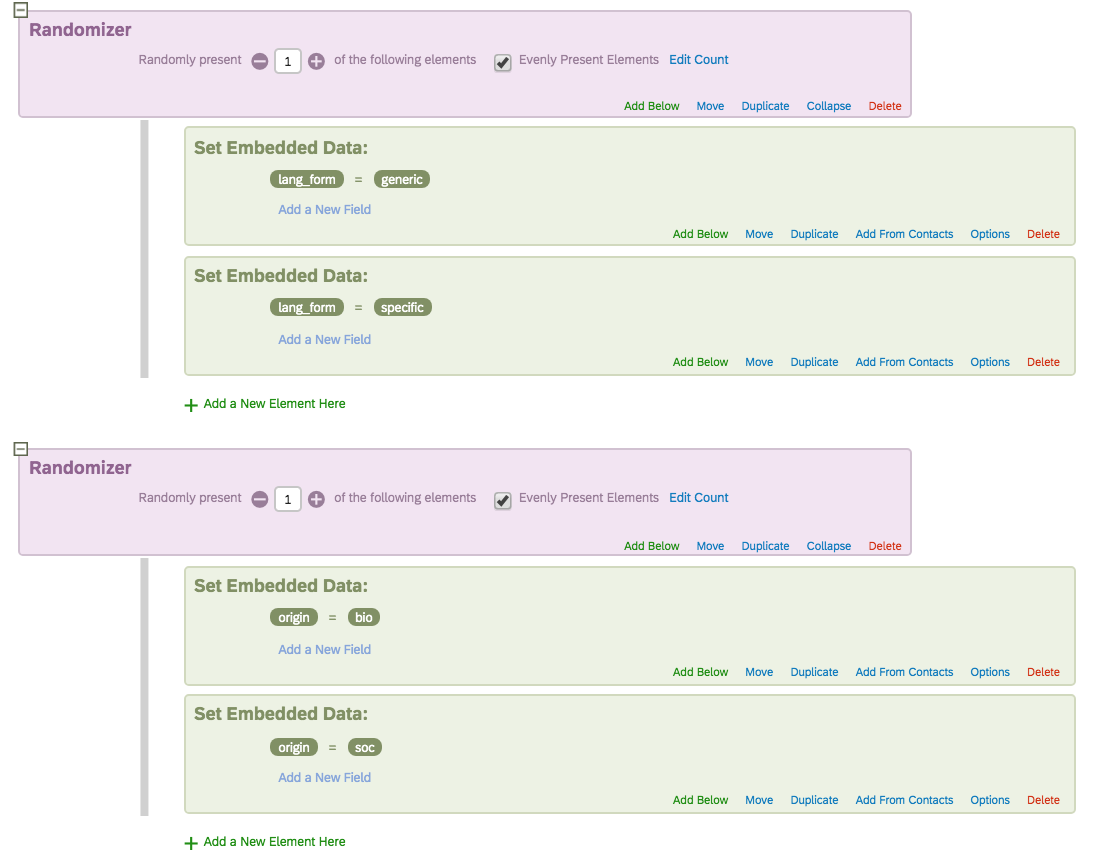
Now that these conditions have been created, you can use branching logic that relies on the embedded data you have set. You can create branching options that present particular blocks to participants that meet specific criteria, as shown below. One great benefit to this option is that your exported data will include columns for each of your IVs, populated with the level of that IV that participants were assigned to.

Keeping in mind that the DiscoveriesOnline platform records participants using their webcam, you may be interested to keep track of what participants are seeing on their screen as they navigate through the survey. Luckily, this is made fairly easy by structuring your study in a way that would allow you to configure your Study Flow to collect embedded timing data (please see here for more information about how to do this). Once the embedded timing data is structured into your survey, you would be able to import the timing data into Datavyu, sync it with the video from your participants’ webcams, and know which trial participants are seeing at any given time.
Qualtrics allows you to rename your questions on the left side of them. Doing so is not only particularly helpful for the organization of your survey but also renames your variables in your exported data file. Therefore, try to name questions with short, clear descriptions that will make your data processing and data analyses easy and straightforward.
When collecting developmental data online, there might be rare cases in which some questions are only used as part of the “game”, but will not be used for analyses. For instance, as part of a study on children’s reactions to social comparison information, we ask for the child’s name and grade level as part of the “game”. However, we are not interested in analyzing these data and do not wish to download or export these data for privacy reasons. Therefore, we can click on the down-pointing arrow icon next to a field and select “Exclude From Analysis”, which will prevent participants’ responses to this question from exporting.
For each question you create in Qualtrics, you can set up conditions for which it should be displayed or skipped. These functions are extremely helpful for developmental psychology research in a number of possible ways (e.g., skipping survey for those who do not give consent, displaying additional instruction only for those who do not pass a comprehension check question, displaying content only for those who are assigned to a certain condition, displaying content only for those who choose to continue in a persistence task, further inquiring extent of a choice based on a previous choice, etc.). To do so, simply select “Add Display Logic” or “Add Skip Logic” in the column that is right of the question you hope to selectively display or skip. You can add display/skip logic simply based on participants’ selections on previous questions (or which questions were displayed to the participant), or you can also use it in combination with the Embedded Data function (see above).
For all question types, you can also validate participants’ responses. This feature is more commonly used for open-ended responses, but can also be used for multiple-choice questions (e.g., you can choose for a customized message to pop out if the participant selects a certain choice). For open-ended responses, you can validate/invalidate based on either content or length. For content validation/invalidation settings, you can limit responses to be numeric, text (non-numeric), US phone numbers, US states, US postal codes, email addresses, dates, etc. For each type of content validation/invalidation, you can also further set restrictions. For example, when restricting a response to be numeric, you can set up the range of numbers that a participant is allowed to enter and even the maximum number of decimals. For length validation/invalidation settings, you can also restrict entries to a maximum/minimum number of characters or a range of characters.
Any time before you export your data from Qualtrics, you can set up how you would like Qualtrics to code participants’ responses, especially for multiple-choice questions. To do so, simply click on the settings icon on the left side of the question and select Recode Values. Then, you can set up how you would like Qualtrics to export each response choice (e.g., 0 for “No” and 1 for “Yes’).
Advanced Animation and Video Editing
While Keynote and Powerpoint animations offer simple and effective methods to create basic stimuli, professional software can lead to more engaging and dynamic stimuli/materials for a study. For example, creating animated characters who can talk and move around is only possible with more advanced software, particularly with the use of keyframes. Using tools provided in professional software, stimuli can engage people in a similar manner to the natural world, more accurately reflecting what they regularly observe in television, video games, apps and other mediums. Recommended animation and video editing software from the Adobe Creative Cloud.
If you have access to the Adobe creative cloud suite, Character Animator provides a streamlined way to create fast and engaging animated characters and scenes.
In general, this software is great for creating characters and live recording animated faces and lips. It also allows you to import external audio and create auto lip sync for your characters. Another benefit of this software is the use of keyframes, which serve as the basis for every animation software.
Typically used for video editing, Adobe Premiere Pro can also serve as a fantastic tool for basic keyframe animations or scenes.
In general, this software can be used to add text and advanced graphics to a scene, export video in different formats.
Adobe After Effects is the most comprehensive and advanced software for animation as part of the Adobe suite. Generally, it requires a higher end device to run smoothly and it is used for advanced animation and precision editing. There are a handful of useful free tutorials available to get started:
Using LinkedinLearning is another great resource for Adobe After Effects, providing more advanced and comprehensive animation tutorials.
Tips
Organizing files and folders to easily access video clips (eg., exported .mp4 or .mov files), images (eg., characters and background images), and audio files (eg., voice overs, sound effects, and music)Creating rough or in progress versions of ideas
Finalizing ideas, scripts, characters, etc. before you start animating